
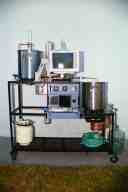
I faced several challenges in designing the brewing rack,
A three-tier rack is too high. A single-tier rack may be ideal,
but would require an additional pump. There is always a concern
regarding H.S.A. (Hot Side Aeration) when using a pump.
With a two-tier rack, you have the luxury of gravity to transfer
water between the sparge and mash vessel or wort between the mash
and boil vessel. Using the pump to transfer water and gravity
to transfer wort does the most to reduce the possibility of H.S.A.,
therefore, the mash vessel was placed on the second tier with
the sparge vessel.

I wanted to keep the PC and electronics drawer as far away from the heat of the propane stoves as possible. I positioned the PC and electronics drawer under the mash vessel which is the only vessel without a propane stove.
The monitor and keyboard needed to be ergonomically correct. An
operator of average height needed to be able to stand in front
of the rack and comfortably view the monitor while typing on the
keyboard.

I experimented with horizontal and vertical orientations for the RIMS tube. I ended up with the RIMS tube mounted vertically, directly in line with the three vessels and right in the middle of the sparge and mash vessels. The terminals of the heater element pass through a hole in the stainless steel work surface. A plug attached to the terminals goes to a weatherproof electrical box.

The pumps "hang" directly below the RIMS tube with the mash pump facing the front of the rack and the sparge pump facing the rear. The pumps are spaced just far enough apart to allow the heater element plug to pass. The pumps are enclosed in a stainless steel pump housing which protects them from water/wort and heat from the sparge stove. The screws of the pump housing are easily accessible for cleaning.

The rack is made from 1¼" angle iron. I added two cross-members
under each pot to better distribute the weight. The width of the
cross-members was chosen to match the width of the cast iron stove
tops. I should have added a pair of vertical members towards the
center of the rack to better support the weight of the upper tier.
The overall dimensions of the brewing rack were determined by the dimensions of the Vollrath pots, the height of the counter-flow wort chiller and the height of a 6.5 gallon glass carboy.
The width and depth of the rack were chosen to contain the bottom drain(s) of the pots.
You'll notice that the handles of all three pots are to the front and back of the rack. This allowed for the pots to be placed closer together, minimizing the overall width of the rack, however, it does make removing the center pot more difficult.
The height of the rack was chosen to allow wort to be gravity fed from the mash vessel into the boil vessel, from the boil vessel through the counter-flow wort chiller and from the wort chiller to the top of a 6.5 gallon glass carboy.